If your HSPA modem cant show even when the device is attached follow the following steps to troubleshoot and automatically fix HSPA modem no device error:
1.First you have to uninstall then reinstall the the device and the drivers To uninstall the drivers :
click on search icon and search for device manager
On the device manager click on Ports(COM&LPT)
Right click on each of the modem drivers and click the uninstall driver option
To uninstall the device(hspa modem)
Note;Close hspa modem first before uninstallation
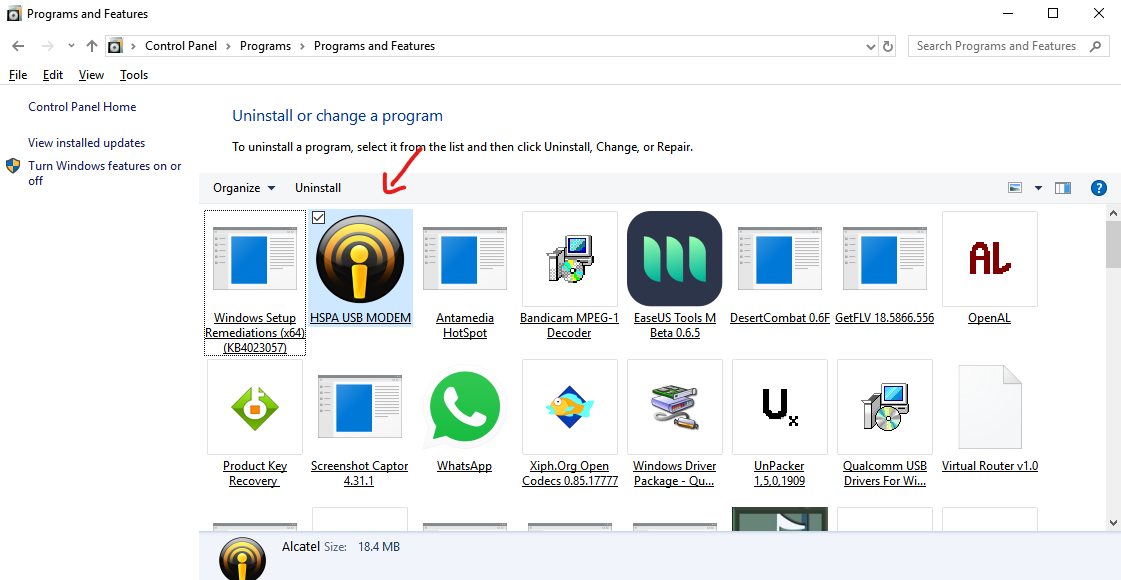
Click on search icon and search for control panel
On the control panel navigate to Programs
Click on uninstall a program
Right click on the hspa modem
Follow the onscreen instructions.
Reboot your computer
To reinstall the device and the drivers :
Attach the hspa modem to your computer
Navigate to my pc and click on hspa modem cd drive
Right click on autorun.exe file then select run as administrator
Follow the onscreen instructions to install the device and the drivers
If the error is still there follow step 2
2. Run the program in compatibility mode for previous windows versions
How To Install Aircrack-ng On Android Using Termux
how to install aircrack-ng in termux
In this article i will shows you how to install aircrack-ng in android using Termux application.
Aircrack-ng is a network software suite consisting of a detector, packet sniffer, WEP and WPA/WPA2-PSK cracker and analysis tool for 802.11 wireless LANs. It works with any wireless network interface controller whose driver supports raw monitoring mode and can sniff 802.11a, 802.11b and 802.11g traffic
Nowadays so many people complain about Microsoft .NET framework.A major issue with .NET is it’s huge in terms of disc space and its also getting bigger with every release.Another issue is the large amount of security fixes for it and also large proportion of Windows updates will likely be .NET framework related.
The .NET framework doesn’t really impact on system performance but what it does do is install thousands of files, folders and registry entries onto your system.With so much data surrounding .NET and the complexity of the installs it’s quite easy for updates to fail or the framework itself fail because something has been corrupted and programs that rely on it won’t run. Here i will show you some various ways to fix .NET Framework issues.
Download and run the .net framework repair tool .The repair test will run 9 different tests to analyze the system problems and fix them issues automatically.
The tool will repair only repair the versions of .NET that have been installed either by you or Windows update.
On the tool try all the options to fix Net framework errors
2. Repair .NET Framework via Programs and Features
Go to Windows Start Menu -> Control Panel -> Add or Remove Program
SelectMicrosoft .NET Framework 4 Extended listed in programs and features.
ClickChange/Uninstall,Removeor Repair.
This will launch a Setup Wizard.
Select theRepairoption, clickNext.
The wizard will perform a repair on the .NET Framework installation.
Restart the Computer.
NOTE: The Net framework function is only available in windows xp,vista and 7 only
This error pops up when size of the firmware (ROM) you are trying to flash is bigger than the space given on the phone. Try using another version of sp flash tool. Sometimes this error occurs when using a wrong ROM.
2. Error 8038: SP FLASH TOOL ERROR Fix : If you encounter this error, you need to click the “firmware-upgrade” to start flash. Also the version of SP flash tool is not match with your phone.
3. Error 5054 – BROM ERROR S_DL_GET_DRAM_SETTINGS_FAIL (5054) Fix : Need to Check load matches your target which is to be downloaded. For more info, that the file you’re trying to flash do not belong or not compatible with your phone. Verify that you are using the right version of files for your device. If so, try to formatting before flashing again.
4. S_COM_PORT_OPEN_FAIL (1003) This error is seen when the com ports on your PC are disabled. Try enabling com ports in your BIOS
5. Error 5056 – BROM ERROR : S_DL_PMT_ERR_NO_SPACE (5069), Fix : It means that the files that you are trying to flash is larger than the available space or your device partition, Ensure the files that you are trying to flashing is exact for your device model, try another ROM
6. Error 3144: S_DA_EMMC_FLASH_NOT_FOUND Fix : Flash boot files Scatter. TXT mismatch, ensure recovery file is the right one! Notice EMMC partition phone and MTD partition phone use different TXT boot file!
7. Error 4032: Operation Skill Problems Fix : Press the volume down button (key to reduce volume), then it can trigger the yellow bar progress continue. You’d better install batteries in your mobile during flash process.
8. Error 8038: SP FLASH TOOL ERROR Fix : If you encounter this error, you need to click the “firmware-upgrade” to start flash. Also the version of SP flash tool is not match with your phone.
9. Error 8038 Android download pmt is ready and layout has been changed, this mean SP Flash Tool is having problem writing to device partitions due to some incompatibility Fix : Format your device, but don’t format the bootloader and then try to flashing files again using download button, but sometime firmware ? upgrade button solve the problem.
10. Error 1022 means Version SP flash tool doesn’t match with your mobile phone or the USB interface doesn’t work well. Fix : Do Change to another USB interface. Sill does not work then download the latest version of sp flash tool instead.
12 Error 3144: S_DA_EMMC_FLASH_NOT_FOUND Fix : Flash boot files Scatter. TXT mismatch, ensure recovery file is the right one! Notice EMMC partition phone and MTD partition phone use different TXT boot file!
13. Error 4001 : S_FT_DA_NO_RESPONSE or Da didn't send response data to FlashTool!
Fix: Change the usb port,run sp flashtool as admin,try another pc and usb cord,
14. Error 4004: Driver Error Fix : Try to install MTP driver, if does not work, Uninstall the driver and reinstall it again or reinstall your computer.
15 Error 5066: S_DL_PC_BL_INVALID_GFH_FILE_INFOR Fix : Error appears when import boot file TXT. You need to check whether the file is the correct one or not, and operate again.
16. Error 8100: Cannot find USB port! This is because of the driver is not recognized completely or not install completely. Fix : Reinstall the driver and restart. Try to Change to another PC or desktop.
17. Error Initialize scatter failed : Initialize scatter file failed. Please check the scatter file name you load is legal, SP flash tool does not accept the name format of scatter file, folder and everything that link to scatter file. Fix : Make sure scatter file, folder and etc have legit name format, without contains any unique character.
18. Error 5066: S_DL_PC_BL_INVALID_GFH_FILE_INFOR Fix : Error appears when import boot file TXT. You need to check whether the file is the correct one or not, and operate again.
19. Error 4004: Driver Error Fix : Try to install MTP driver, if does not work, Uninstall the driver and reinstall it again or reinstall your computer.
20. Error 8200: OS of your mobile phone is not the same chip platform with your recovery file. Fix : 1. Find the right recovery file. 2. Update to the latest SP flash tool.
21. Error 2005: S_BROM_CMD_STARTCMD_FAIL Fix : This error occurs that the incomplete load of the flash file, Just reopen the sp flash tool, and keep on your flash process.
22. S_DA_EXT_RAM_ERROR (3001) Connection problems. Check USB cord or use another port.
Ensure to run the latest version of SP flash tool as Administrator
Format first then Download
Don't tick a box with an unspecified / empty file path
24. S_FT_DOWNLOAD_FAIL (4008) Change USB cord or Use Battery to flash the phone or Change the version of SP Flash Tool. (Older versions preferable)
25. S_INVALID_DA_FILE (5002)
Use another version of SP Flash Tool
26. BROM ERROR : S_FT_DOWNLOAD_FAIL (2004)
Fix: Try a different USB cord
Try a different port on the PC or another PC
Ensure the battery is well changed and inside the switched off phone before connecting to PC for flashing
A Secure Boot Download Agent (DA) might be required
Take out and reinsert the battery
Try using a different USB cord, port and PC
Right-click flash_tool.exe > Select Properties > Select Compatibility > Set to Windows Service Pack 3 > Click Apply > Click OK > Run SP flash tool as Administrator
27. If all the above didn't work try installing usb deview in your pc and remove all the old usb and preloader drivers,you can click on the video below to view the steps.
HOW TO ROOT OPPO A37FW ,UNLOCK BOOTLOADER AND INSTALL TWRP RECOVERY IMAGE
Root is the access to all of the
Android's system files and the the possibility to modify them. There
is an application - SuperUser/SuperSU - which is used for managing
those actions, as well as CWM (ClockWorkMod) and TWRP (Team Win
Recovery Project).
Root Oppo A37Fw: If you looking for a way to Root Oppo A37Fw with or without PC , then you
are at the right Place. In this post i will show you how to Root Oppo a37fw
unlock bootloader and install twrp.
Disclaimer
https://neshtodaystech.blogspot.com/?m=1
will not be responsible for Dead SD Cards, Bricked Devices or any
other Mishappening with your device. This guide is only for oppo a37fw so
dont on any other device.
Pros of Rooting Oppo A37fw
>Your Oppo a37fw will Perform faster . > Great Software Experience After installing Custom ROM in Oppo a37fw . > RAM will occupy very Less Space. >increased Battery Life.
>You will have the ability to uninstall system apps
Cons of Rooting Oppo A37fw
>Your Oppo a37fw Device will be less secured. >If you are first timer , you may brick your Oppo a37fw device.
>Warranty may be void from oppo.
Requirements
> Your Oppo A37fw will be charged above 60% >Oppo A37Fw drivers downloaded from Oppo A37fw Download Section >original oppo a37fw usb cable or charging cable >Backup Of your Oppo A37Fw rom
Now to gain root access on Oppo A37Fw follow the following steps :
1.Extract all files from this Zip file and
look for Msm8x39DownloadTool.exe(Msm8x39DownloadTool.exe
is tool to flash Oppo A37fw)
2. Start application and click on verify.(A box will appear check in Screenshot. This ensures that you have
all correct files)
3. After getting “verify OK” dialogue box, switch off
your device.
4. Press and hold both volume up and volume down keys
and connectUSB to your PC/Laptop.
5. If you’re able to see COM in “Device Type” Column in flashtool that means you’ve successfully installed drivers and ready to flash Oppo A37fw.
6. Click on “Start”(Wait for some time after completing, it will show green coloured
message “USB Download Completed”)6. Disconnect your device from USB and pOWER IT on.
Thanks to Krishsns from xda forum for providing the modified Oppo
A37Fw firmware.
Note :After root your wifi wont work you have to flash a new boot
image to enable wifi
>Unlock bootloader video link>To unlock oppo A37Fw bootloader download oppo tools link>then click on unlock and tamper>For complete guide view video tutorial link


